{{tip|Simantics is an open source software platform, licensed under Eclipse Public License EPL (more information in section [https://www.simantics.org/about/licensing Licensing]). The source code for both semantic database engine Simantics Core and the client Simantics Workbench is available to '''registered users'''. To gain access to the complete Simantics SDK source code, go to the [https://www.simantics.org/members/index.php Simantics Members Wiki] and [https://www.simantics.org/members/index.php/Special:RequestAccount request an account].}}
=== JDK ===
=== JDK ===
* JDK 6.0 (= Java Standard Edition 1.6) is required. The latest update should always work. Get it [http://java.sun.com/javase/downloads/?intcmp=1281 here].
* 64-bit JDK 8.0 (= Java Standard Edition Development Kit) is required. The latest update should always work. Get it [http://www.oracle.com/technetwork/java/javase/downloads/jdk8-downloads-2133151.html here].
** '''IMPORTANT:''' See [http://wiki.eclipse.org/FAQ_How_do_I_run_Eclipse%3F#Oracle.2FSun_VM_1.6.0_21_on_Windows this notice] if using JDK 6 update 21. We suggest using update 20 at the moment if possible.
=== Eclipse IDE ===
=== Eclipse IDE ===
* Get latest eclipse SDK Helios (3.6 series): http://www.eclipse.org/downloads/, choose ''Eclipse for RCP and RAP Developers''
* Get the latest 64-bit Eclipse (currently Neon): http://www.eclipse.org/downloads/
** '''DO NOT USE the 64-bit builds on Windows, 32-bit works better for the time being'''
* In the installer, choose ''Eclipse for RCP and RAP Developers''
* Start Eclipse with a new empty workspace. The program will query you for the workspace location.
* Extract the installation package to your preferred location, e.g. ''d:\''. The package already contains a directory called ''eclipse''.
[[Image:InstalledJREs.png|right|100px|thumb|Java VM selection preference page]]
* Start Eclipse with a new empty workspace by launching the executable within the package. The program will query you for the workspace location.
* [[Image:InstalledJREs.png|right|100px|thumb|Java VM selection preference page]] If you have multiple JRE/JDK versions installed, check that your Eclipse is using the the right one from ''Window/Preferences'': ''Java/Installed JREs'' as shown below. For example in windows the active JRE and JDK locations should be something like:
* If you have multiple JRE/JDK versions installed, check that your Eclipse is using the the right one from ''Window/Preferences'': ''Java/Installed JREs'' as shown below. For example in Windows the active JRE and JDK locations should be something like:
Open the preferences dialog from main menu '''Window/Preferences'''. From the tree on the left go to '''General/Network Connections''' and modify the settings so that HTTP connections are checked to have a proxy.
Open the preferences dialog from main menu '''Window/Preferences'''. From the tree on the left go to '''General/Network Connections''' and modify the settings so that HTTP connections are checked to have a proxy.
=== Simantics Tooling ===
Select menu '''Help/Install New Software''' and write http://www.simantics.org/update/utils into the ''Work with'' text field. Install the latest ''Ontology Development/Graph Feature''. This provides the possibility to create ''Simantics Ontology Projects'', i.e. allows IDE integrated development of the ontologies (data models) used in the Simantics application you are developing.
See [[org.simantics.graph]] for the component's documentation.
=== Eclipse plug-in for Subversion ===
=== Eclipse plug-in for Subversion ===
{{tip|With Simantics 1.4 and future releases this step is optional.}}
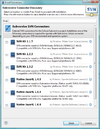
Simantics uses Subversion ([http://subversion.apache.org/ SVN]) as a version control system ([http://en.wikipedia.org/wiki/Revision_control VCS]) for storing all of our source code. To access this data from neatly from Eclipse, you need to install some plug-ins into it. To install the plug-in, follow these instructions:
Simantics uses Subversion ([http://subversion.apache.org/ SVN]) as a version control system ([http://en.wikipedia.org/wiki/Revision_control VCS]) for storing all of our source code. To access this data from neatly from Eclipse, you need to install some plug-ins into it. To install the plug-in, follow these instructions:
Line 30:
Line 42:
*#** '''Subversive SVN Team Provider'''
*#** '''Subversive SVN Team Provider'''
*#** '''Subversive SVN JDT Ignore Extensions'''
*#** '''Subversive SVN JDT Ignore Extensions'''
*#** '''Subversive SVN Integration for the Mylyn Project'''
*#* Select Finish and watch the installation proceed
*#* Select Finish and watch the installation proceed
*#* Click ''Restart Now'' after the installation completes
*#* Click ''Restart Now'' after the installation completes
*# After restarting, Eclipse should open a dialog called '''Install Connectors'''. Select '''SVN Kit 1.3.x''' and press finish.
*# After restarting, open the '''SVN Repository Exploring''' perspective and Eclipse should open a dialog called '''Install Connectors'''. Select '''SVN Kit 1.3.x''' and press finish.
* <span style="font-size:x-small">Be warned that there has been a bug in Subversive which causes it to use the HTTP proxy for HTTPS addresses too. In order to get your SVN connection to www.simulationsite.net working, you may need to use direct connection proxy settings after installing the SVN plug-ins.</span>
* <span style="font-size:x-small">NOTE: if this installation process fails, this means that Eclipse is offering broken/incompatible packages at the moment. In this case you probably need to install the latest ''early access'' versions using http://www.eclipse.org/subversive/downloads.php#early_access</span>
=== Simantics Tooling ===
* <span style="font-size:x-small">Be warned that there has been a bug in Subversive which causes it to use the HTTP proxy for HTTPS addresses too. In order to get your SVN connection to www.simantics.org working, you may need to use direct connection proxy settings after installing the SVN plug-ins.</span>
Select menu '''Help/Install New Software''' and write http://www.simantics.org/update into the ''Work with'' text field. Install the latest ''Ontology Development/Graph Feature''. This provides the possibility to create ''Simantics Ontology Projects'', i.e. allows IDE integrated development of the ontologies (data models) used in the Simantics application you are developing.
See [[org.simantics.graph]] for the component's documentation.
== Setup IDE ==
== Setup IDE ==
* Import Simantics Java formatting rules into your Eclipse: [[Media:Simantics-Java-Formatting.xml | save this XML file]]
* Import Simantics Java formatting rules into your Eclipse: [[Media:Simantics-Java-Formatting.xml | save this XML file]] ([[Image:Simantics-Java-Formatting.xml | save this XML file]])
** In Eclipse: ''Window/Preferences'' and the ''Java/Code Style/Formatter'' folder, select ''Import...'' and find the XML file you just downloaded.
** In Eclipse: ''Window/Preferences'' and the ''Java/Code Style/Formatter'' folder, select ''Import...'' and find the XML file you just downloaded.
* From the same preferences dialog also make sure that JDK 6.0 (or JRE 1.6) compliance is enabled:
* From the same preferences dialog also make sure that JDK 6.0 (or JRE 1.6) compliance is enabled:
Line 57:
Line 64:
== Download Simantics ==
== Download Simantics ==
The only thing you absolutely need to have for developing at this point is the target platform. Download and install it as instructed in the following and you're ready to go.
=== Simantics 1.4+ Instructions ===
See [[Target Platform]] for more information.
Follow the instructions on the [[Target Platform#Simantics 1.4|Target Platform page]] to set the Simantics 1.4 target platform up for your workspace.
=== Install Simantics target platform ===
=== Pre-Simantics 1.4 Instructions ===
==== Install Simantics target platform ====
The target platform is a set of Simantics and Eclipse features and plug-ins that constitute the components you can build your Simantics/Eclipse-based software out of. These are needed as base to get working on your own contributions on top of the Simantics platform.
The target platform is a set of Simantics and Eclipse features and plug-ins that constitute the components you can build your Simantics/Eclipse-based software out of. These are needed as base to get working on your own contributions on top of the Simantics platform.
To get the platform one must perform a [http://svnbook.red-bean.com/en/1.5/svn.tour.initial.html|''checkout''] from the SVN repository. You can use Eclipse's '''SVN Repository Exploring perspective''' for this task. You can also use other tools, such as [http://tortoisesvn.net TortoiseSVN] or the [http://subversion.tigris.org/getting.html#binary-packages SVN command line client].
To get the platform one must perform a [http://svnbook.red-bean.com/en/1.5/svn.tour.initial.html''checkout''] from the SVN repository. You can use Eclipse's '''SVN Repository Exploring perspective''' for this task. You can also use other tools, such as [http://tortoisesvn.net TortoiseSVN] or the [http://subversion.tigris.org/getting.html#binary-packages SVN command line client].
# '''Checkout the target platform''' for your version into a directory of your choice. See [[Target Platform]] for available versions.
#* Updating your target platform is now a matter of updating your target platform working copy.
#* Upgrading to newer versions of the target platform requires switching to/checking out another branch of the target platform.
# '''Import the target platform into your eclipse IDE''':
#* If you checked out the target platform using another tool besides Eclipse, first import the target platform into your workspace:
#** ''File/Import'': ''General/Existing Project into Workspace'': Select target platform location as ''root directory''. '''Deselect''' ''Copy projects into workspace'' if selected. Press ''Finish''.
#* Select menu item ''Window/Preferences'' from your Eclipse IDE.
#* Open the preference page Plug-in Development/Target Platform.
#* Activate your target platform definition by checking it and press OK.
To get started on development, continue to '''[[Tutorial: Ontology Development]]'''.
Line 90:
Line 86:
</blockquote>
</blockquote>
=== OPTIONAL STEPS ===
==== Developing Simantics Components ====
# '''Checkout the target platform''' for your version into a directory of your choice. See [[Target Platform]] for available versions.
#* Updating your target platform is now a matter of updating your target platform working copy.
#* Upgrading to newer versions of the target platform requires switching to/checking out another branch of the target platform.
# '''Import the target platform into your eclipse IDE''':
#* If you checked out the target platform using another tool besides Eclipse, first import the target platform into your workspace:
#** ''File/Import'': ''General/Existing Project into Workspace'': Select target platform location as ''root directory''. '''Deselect''' ''Copy projects into workspace'' if selected. Press ''Finish''.
#* Select menu item ''Window/Preferences'' from your Eclipse IDE.
#* Open the preference page Plug-in Development/Target Platform.
#* Activate your target platform definition by checking it and press OK.
==== Download Simantics Components ====
===== Add Simantics repositories =====
===== Add Simantics repositories =====
Line 98:
Line 103:
* Add the main Simantics repository location in the SVN Repository view:
* Add the main Simantics repository location in the SVN Repository view:
* Checkout the proper project sets into your workspace. Eclipse will check it out as ''ProjectSets'':
* Checkout the proper project sets into your workspace. Eclipse will check it out as ''ProjectSets'':
** '''Simantics 1.2 development version''': ''project-set/trunk''
** '''Simantics development version''': ''project-set/trunk''
* Switch to ''Java perspective''.
* Switch to ''Java perspective''.
Line 115:
Line 120:
* If the project set import fails or does not do anything, please update your SVN plug-ins to the latest versions available.
* If the project set import fails or does not do anything, please update your SVN plug-ins to the latest versions available.
=== Start Development ===
To get started on development, continue to '''[[Tutorial: Ontology Development]]'''.
== Basic IDE Usage ==
== Basic IDE Usage ==
=== Running Products from the IDE ===
=== Running Products from the IDE ===
* Create a Product Configuration (.product) for your own product.
* Create a '''Product Configuration''' (.product) for your own product.
** You can use '''[https://www.simulationsite.net/trac/simantics/browser/sysdyn/trunk/org.simantics.sysdyn.ui/sysdyn.product sysdyn.product]''' as a starting point for your own product configuration.
** You can use '''[https://www.simulationsite.net/trac/simantics/browser/sysdyn/trunk/org.simantics.sysdyn.ui/sysdyn.product sysdyn.product]''' as a starting point for your own product configuration. To get '''sysdyn.product''', import the '''sysdyn.psf''' project-set.
** Be sure to only include the components that you want to have in your product, nothing more.
** Be sure to only include the components that you want to have in your product, nothing more.
Line 127:
Line 136:
* When launching the Simantics Workbench application from the IDE, i.e. in development mode, the application will make sure that your application workspace will contain a Simantics database that contains the transferable graphs contained by the ontology project bundles that are included in your product's plug-in configuration.
* When launching the Simantics Workbench application from the IDE, i.e. in development mode, the application will make sure that your application workspace will contain a Simantics database that contains the transferable graphs contained by the ontology project bundles that are included in your product's plug-in configuration.
** Be warned that the application can't handle nearly all cases of database contents. This means that sometimes the easiest way to get your application running is clearing your application's workspace and starting with a fresh database.
** Be warned that the application can't handle all cases of modified database contents. This means that sometimes the easiest way to get your application running is clearing your application's workspace and starting with a fresh database.
Line 162:
Line 171:
Deploying a product in this context means taking a certain set of features and plug-ins and packaging into an installable and executable application.
Deploying a product in this context means taking a certain set of features and plug-ins and packaging into an installable and executable application.
; Things to ensure before deploying your product:
# '''Ensure correctness of your build.properties files'''
#* For each of your own bundles (plug-ins and features), check that their ''build.properties'' files contain all the necessary files within each bundle. For example '''adapters.xml''' is often forgotten from the build since there is currently no automation that would add it to the build.
# '''Ensure validity of .product definition:'''
#* Open your .product file in the Eclipse IDE (use Ctrl-Shift-R for searching)
#* On the ''Launching'' page:
#** Set '''Launcher Name''' to set the name of your product executable.
#** Under '''Program Arguments:''', add -fixerrors. This ensures that your product will initialize all new workspaces with a database instead of assuming that a database must already pre-exist.
#** Under '''VM Arguments:''' add at least '''-ea''' to enable VM assertions.
; Deploying Executable Product
; Deploying Executable Product
* Open a .product file in the Eclipse IDE (use Ctrl-Shift-R for searching)
* Open .product file in the Eclipse IDE (use Ctrl-Shift-R for searching)
* On the ''Overview'' page of the product editor, select ''Eclipse Product export wizard'' from under '''Exporting'''
* On the ''Overview'' page of the product editor, select ''Eclipse Product export wizard'' from under '''Exporting'''
* Fill in any missing details in the dialog and select Finish.
* Fill in any missing details in the dialog and select Finish.
** To create a directly executable product, you need to deselect '''Generate metadata repository'''.
** To create a directly executable product, you need to deselect '''Generate metadata repository'''.
** To create a product deployable with [[SPM]], you need to select '''Generate metadata repository'''.
** To create a product deployable with [http://wiki.eclipse.org/Equinox/p2/Director_application P2 director] (and in the future [[SPM]]), you need to select '''Generate metadata repository'''. This will generate an [http://wiki.eclipse.org/Equinox/p2 Eclipse P2] repository.
Simantics is an open source software platform, licensed under Eclipse Public License EPL (more information in section Licensing). The source code for both semantic database engine Simantics Core and the client Simantics Workbench is available to registered users. To gain access to the complete Simantics SDK source code, go to the Simantics Members Wiki and request an account.
JDK
64-bit JDK 8.0 (= Java Standard Edition Development Kit) is required. The latest update should always work. Get it here.
In the installer, choose Eclipse for RCP and RAP Developers
Start Eclipse with a new empty workspace. The program will query you for the workspace location.
Java VM selection preference page
If you have multiple JRE/JDK versions installed, check that your Eclipse is using the the right one from Window/Preferences: Java/Installed JREs as shown below. For example in Windows the active JRE and JDK locations should be something like:
C:\Program Files\Java\jre1.8.0_<update number>
C:\Program Files\Java\jdk1.8.0_<update number>
IMPORTANT: HTTP proxy
If you are on a network where the only way to access the internet via HTTP is through an HTTP proxy you need to make sure that Eclipse also uses this proxy. Corporate networks tend to be like this. If you do not do this, you cannot install anything using Eclipse's own plug-in installer.
Open the preferences dialog from main menu Window/Preferences. From the tree on the left go to General/Network Connections and modify the settings so that HTTP connections are checked to have a proxy.
Simantics Tooling
Select menu Help/Install New Software and write http://www.simantics.org/update/utils into the Work with text field. Install the latest Ontology Development/Graph Feature. This provides the possibility to create Simantics Ontology Projects, i.e. allows IDE integrated development of the ontologies (data models) used in the Simantics application you are developing.
With Simantics 1.4 and future releases this step is optional.
Simantics uses Subversion (SVN) as a version control system (VCS) for storing all of our source code. To access this data from neatly from Eclipse, you need to install some plug-ins into it. To install the plug-in, follow these instructions:
Install Subversion plug-in: Eclipse Subversive. Update Site is a part of Helios Update Site. From the main menu, open Help > Install New Software...
From the Collaboration folder, select the following items:
Subversive SVN Team Provider
Subversive SVN JDT Ignore Extensions
Select Finish and watch the installation proceed
Click Restart Now after the installation completes
After restarting, open the SVN Repository Exploring perspective and Eclipse should open a dialog called Install Connectors. Select SVN Kit 1.3.x and press finish.
NOTE: if this installation process fails, this means that Eclipse is offering broken/incompatible packages at the moment. In this case you probably need to install the latest early access versions using http://www.eclipse.org/subversive/downloads.php#early_access
Be warned that there has been a bug in Subversive which causes it to use the HTTP proxy for HTTPS addresses too. In order to get your SVN connection to www.simantics.org working, you may need to use direct connection proxy settings after installing the SVN plug-ins.
In Eclipse: Window/Preferences and the Java/Code Style/Formatter folder, select Import... and find the XML file you just downloaded.
From the same preferences dialog also make sure that JDK 6.0 (or JRE 1.6) compliance is enabled:
Optionally enable Save Actions: Java/Editor/Save Actions:
enable Organize imports
enable Additional actions
enable Format source code (not always recommendable)
Configure: Code Organizing: Enable Remove trailing whitespace and Correct indentation
Download Simantics
Simantics 1.4+ Instructions
Follow the instructions on the Target Platform page to set the Simantics 1.4 target platform up for your workspace.
Pre-Simantics 1.4 Instructions
Install Simantics target platform
The target platform is a set of Simantics and Eclipse features and plug-ins that constitute the components you can build your Simantics/Eclipse-based software out of. These are needed as base to get working on your own contributions on top of the Simantics platform.
To get the platform one must perform a checkout from the SVN repository. You can use Eclipse's SVN Repository Exploring perspective for this task. You can also use other tools, such as TortoiseSVN or the SVN command line client.
How do I check out from SVN in Eclipse in general?
Switch to the SVN Repository Exploring perspective.
In the SVN Repositories view, from the context menu, select New → Repository Location.
Enter the SVN repository location in the URL field and enter your repository credentials in the authentication fields.
Browse the added repository tree, select the directory/project you want to access and edit, and select Check out from the context menu.
Checkout the target platform for your version into a directory of your choice. See Target Platform for available versions.
Updating your target platform is now a matter of updating your target platform working copy.
Upgrading to newer versions of the target platform requires switching to/checking out another branch of the target platform.
Import the target platform into your eclipse IDE:
If you checked out the target platform using another tool besides Eclipse, first import the target platform into your workspace:
File/Import: General/Existing Project into Workspace: Select target platform location as root directory. DeselectCopy projects into workspace if selected. Press Finish.
Select menu item Window/Preferences from your Eclipse IDE.
Open the preference page Plug-in Development/Target Platform.
Activate your target platform definition by checking it and press OK.
Download Simantics Components
Add Simantics repositories
Switch to SVN Repository Exploring perspective in Eclipse.
Add the main Simantics repository location in the SVN Repository view:
Create a Product Configuration (.product) for your own product.
You can use sysdyn.product as a starting point for your own product configuration. To get sysdyn.product, import the sysdyn.psf project-set.
Be sure to only include the components that you want to have in your product, nothing more.
Launch the product from the links under the Testing section
When launching the Simantics Workbench application from the IDE, i.e. in development mode, the application will make sure that your application workspace will contain a Simantics database that contains the transferable graphs contained by the ontology project bundles that are included in your product's plug-in configuration.
Be warned that the application can't handle all cases of modified database contents. This means that sometimes the easiest way to get your application running is clearing your application's workspace and starting with a fresh database.
IMPORTANT DEVELOPER NOTICE
Remember to always launch your application using the .product configuration editor as described above when you want to make sure that your IDE's application launcher configuration is up-to-date. The launcher configurations contain the set of plug-ins that are installed into the launched application which means which is not updated when the application is launched through the menu or (Ctrl+)F11.
The launcher configurations will most likely require updating when you
take new plug-ins into use (add them to features included by the product)
remove plug-ins from use
plug-ins are moved from the workspace to the target platform or vice versa
the target platform is updated
Testing your own contributions with Simantics
Scenario - Testing a set of new plug-ins
Prerequisites:
Some of the added plug-ins may contain ontologies.
You've created your own set of plug-ins based on the Simantics SDK.
You've defined features that include your plug-ins.
If you have not already created a product definition for yourself:
Optionally create a new plug-in project with the name product in it
Add a new Product Configuration to an existing or a new plug-in with basic settings
Open the new .product file with Product Configuration Editor
From the Overview tab, Product Definition section, select org.simantics.workbench.application as the application and create a new product extension with the New button beside the product selector. Also mark the product definition feature based.
Configure the product to your liking, i.e. add the features you need to it
Launch your product from the product configuration editor Overview tab
Product Deployment
Deploying a product in this context means taking a certain set of features and plug-ins and packaging into an installable and executable application.
Things to ensure before deploying your product
Ensure correctness of your build.properties files
For each of your own bundles (plug-ins and features), check that their build.properties files contain all the necessary files within each bundle. For example adapters.xml is often forgotten from the build since there is currently no automation that would add it to the build.
Ensure validity of .product definition:
Open your .product file in the Eclipse IDE (use Ctrl-Shift-R for searching)
On the Launching page:
Set Launcher Name to set the name of your product executable.
Under Program Arguments:, add -fixerrors. This ensures that your product will initialize all new workspaces with a database instead of assuming that a database must already pre-exist.
Under VM Arguments: add at least -ea to enable VM assertions.
Deploying Executable Product
Open .product file in the Eclipse IDE (use Ctrl-Shift-R for searching)
On the Overview page of the product editor, select Eclipse Product export wizard from under Exporting
Fill in any missing details in the dialog and select Finish.
To create a directly executable product, you need to deselect Generate metadata repository.
To create a product deployable with P2 director (and in the future SPM), you need to select Generate metadata repository. This will generate an Eclipse P2 repository.