Difference between revisions of "Tutorial: Database Development"
| Line 166: | Line 166: | ||
@Override | @Override | ||
public void exception(AsyncReadGraph graph, Throwable throwable){ | public void exception(AsyncReadGraph graph, Throwable throwable){ | ||
| − | + | // handle exception here | |
} | } | ||
| Line 177: | Line 177: | ||
@Override | @Override | ||
public boolean isDisposed() { | public boolean isDisposed() { | ||
| − | // this must return true when the listener is not needed | + | // this must return true when the listener is not needed |
| − | // anymore | + | // anymore to release the listener |
return false; | return false; | ||
} | } | ||
}); | }); | ||
</pre> | </pre> | ||
| + | |||
=Writing the database= | =Writing the database= | ||
==Setting Literals== | ==Setting Literals== | ||
Revision as of 20:20, 28 September 2010
This tutorial is using Simantics 1.1 development version.
Basic concepts:
- Session: Database session / connection that allows reading and writing the database using transactions.
- Transaction: A database operation; either read, or write operation. Simantics supports three types of transactions: Read, Write, and WriteOnly.
- Resource: A single object in the database.
- Statement: Triple consisting of subject, predicate, and object
- Literal: primitive value (int, double, String,..) or an array of primitive values.
Contents
Reading the database
Literals
In this example we set a Label to show a Resource’s name.
TODO : Definition of Builtins.HasName is changing because of Valuation implementation. It requires names to be unique in the same level (a resource cannot have two resources with Builtins.ConsistsOf-relation and have the same name).
Synchronous read with a return value
One way to read information stored in the database is to use synchronous reads with a return value. Return value can be any Java class, and here it is String.
try {
String name = session.syncRequest(new Read<String>() {
		@Override
		public String perform(ReadGraph graph) throws DatabaseException {
			Builtins b = graph.getBuiltins();
			return graph.getRelatedValue(resource, b.HasName);

		}});
	label.setText(name);
} catch (DatabaseException e) {
	// handle exception here
}
Database connection may fail during the transaction and send and exception. Therefore you have to handle the exception some way. Here we have wrapped the transaction inside try-catch block.
All literals can read the same way, you just have to provide correct relation. There are also other methods to read literals that behave differently:
- getRelatedValue(): returns literal or throws and exception if value is not found
- getPossibleRelatedValue(): returns literal value or null, if the value does not exist.
Asynchronous read Asynchronous read allows creating requests that are processed in the background. If you don’t need the result immediately, it is recommended to use asynchronous reads for performance reasons.
session.asyncRequest(new ReadRequest() {

@Override
	public void run(ReadGraph graph) throws DatabaseException {
		Builtins b = graph.getBuiltins();
		final String name =  graph.getRelatedValue(resource, b.HasName);
		Display.getDefault().asyncExec(new Runnable() {

			@Override
			public void run() {
				if (!label.isDisposed())
					label.setText(name);
			}
		});
	}
});
Here we use separate Runnable to set the label’s text (SWT components must be accessed from main / SWT thread). Note that we have to check if the label is disposed before setting the text.
Asynchronous read with a Procedure
Using a procedure allows you to handle possible exceptions caused by failed asynchronous transaction.
session.asyncRequest(new Read<String>() {
	@Override
	public String perform(ReadGraph graph) throws DatabaseException {
		Builtins b = graph.getBuiltins();
		return graph.getRelatedValue(resource, b.HasName);

	}
}, new Procedure<String>() {
	@Override
	public void exception(Throwable t) {
			// handle exception here
	}

	@Override
	public void execute(final String name) {
		Display.getDefault().asyncExec(new Runnable() {
			@Override
			public void run() {
				if (!label.isDisposed())
					label.setText(name);
			}
		});

	}
});
Asynchronous read with a SyncListener
Using SyncListener (and AsyncListener) with a read transaction leaves a listener to the database that notifies changes in the read data.
session.asyncRequest(new Read<String>() {
	@Override
	public String perform(ReadGraph graph) throws DatabaseException {
		Builtins b = graph.getBuiltins();
		return graph.getRelatedValue(resource, b.HasName);

	}
}, new SyncListener<String>() {
	@Override
	public void exception(ReadGraph graph, Throwable throwable)
					throws DatabaseException {
		// handle exception here

	}

	@Override
	public void execute(ReadGraph graph, final String name)
					throws DatabaseException {
		Display.getDefault().asyncExec(new Runnable() {

			@Override
			public void run() {
				if (!label.isDisposed())
					label.setText(name);
			}
		});

	}

	@Override
	public boolean isDisposed() {
		return label.isDisposed();
	}

});
Here the listener updates the label when the name changes. The method isDisposed() controls lifecycle of the listener, and here when the label is disposed, the listener stops updating the label.
Resources
Reading resources is similar to reading literals. Here is an example that reads all resources that are connected to “resource with a ConsistsOf-relation:
try {
	Collection<Resource> children = session.syncRequest(new Read<Collection<Resource>>() {
		@Override
		public Collection<Resource> perform(ReadGraph graph)
						throws DatabaseException {
			Builtins b = graph.getBuiltins();
			return graph.getObjects(resource, b.ConsistsOf);
		}
	});
} catch (DatabaseException e) {
	// handle exception here
}
Same asynchronous, Procedure, and Listener mechanisms work with reading resources. For example, you can use listener to be notified if resources are added or removed:
session.asyncRequest(new Read<Collection<Resource>>() {
	@Override
	public Collection<Resource> perform(ReadGraph graph)
					throws DatabaseException {
		Builtins b = graph.getBuiltins();
		return graph.getObjects(resource, b.ConsistsOf);
	}
},new AsyncListener<Collection<Resource>>() {
	@Override
	public void exception(AsyncReadGraph graph, Throwable throwable){
		// handle exception here
	}

	@Override
	public void execute(AsyncReadGraph graph,
				Collection<Resource> result) {
		// this is run every time a resource is added or removed
	}

	@Override
	public boolean isDisposed() {
		// this must return true when the listener is not needed
		// anymore to release the listener
		return false;
	}
});
Writing the database
Setting Literals
Here we set a name of a resource to “New name”. Both synchronous and asynchronous versions are similar, the only difference is that with synchronous way you have to handle the exception, while using an asynchronous write without a Procedure does not let you know if the transaction failed.
try {
	session.syncRequest(new WriteRequest() {
		@Override
		public void perform(WriteGraph graph) throws DatabaseException {
			Builtins b = graph.getBuiltins();
			graph.claimValue(resource, b.HasName, "New name");
		}
	});
} catch (DatabaseException e) {
	// TODO Auto-generated catch block
	e.printStackTrace();
}
session.asyncRequest(new WriteRequest() {
	@Override
	public void perform(WriteGraph graph) throws DatabaseException {
		Builtins b = graph.getBuiltins();
		graph.claimValue(resource, b.HasName, "New name");
	}
});
Using a Procedure with a write transaction is similar to read transactions, so we don’t have separate example of that.
Creating new Resources
Same synchronous and asynchronous mechanisms apply to writing new Resources. The difference is that with asynchronous you can use a Callback to check if write failed, or separate WriteResult and a Procedure to return and check custom results of a write transaction.
Here is an example that creates a new library, gives it a name “New Library” and connects it to given resource.
session.asyncRequest(new WriteRequest() {

	@Override
	public void perform(WriteGraph graph) throws DatabaseException {
		Builtins b = graph.getBuiltins();
		Resource newResource = graph.newResource();
		graph.claim(newResource, b.InstanceOf, b.Library);
		graph.claimValue(newResource, b.HasName, "New Library");
		graph.claim(resource, b.ConsistsOf, newResource);

	}
});
The key points here are:
- New resource are created with WriteGraph.newResource()
- You must set resource’s type using InstanceOf-relation.
- If you do not connect created resources anywhere, the resources become orphan resources. Orphan resources cannot be traversed and therefore found from the database.
Deleting resources
TODO : WriteGraph.deny(...) methods are no longer inconsistent, just write it.
Example case: Product and Purchase management
In this example, we will implement a simple product and purchase management system. The system will allow user to define new products, and create new purchase orders. To keep the example simple, the products have just a name and unit cost, and purchase orders will have name of the customer and a list of ordered products.
We have already implemented skeleton for the system. It contains basic user interface for creating products and purchases, but it lacks several features that we are going to add during this tutorial. The base code can be found from SVN:
- https://www.simulationsite.net/svn/simantics/tutorials/trunk/org.simantics.example
- https://www.simulationsite.net/svn/simantics/tutorials/trunk/tutorial_ontologies
- https://www.simulationsite.net/svn/simantics/tutorials/trunk/org.simantics.tutorials.feature
TODO : while the turorial code exists, currently SVN contains version that is the result of this tutorial.
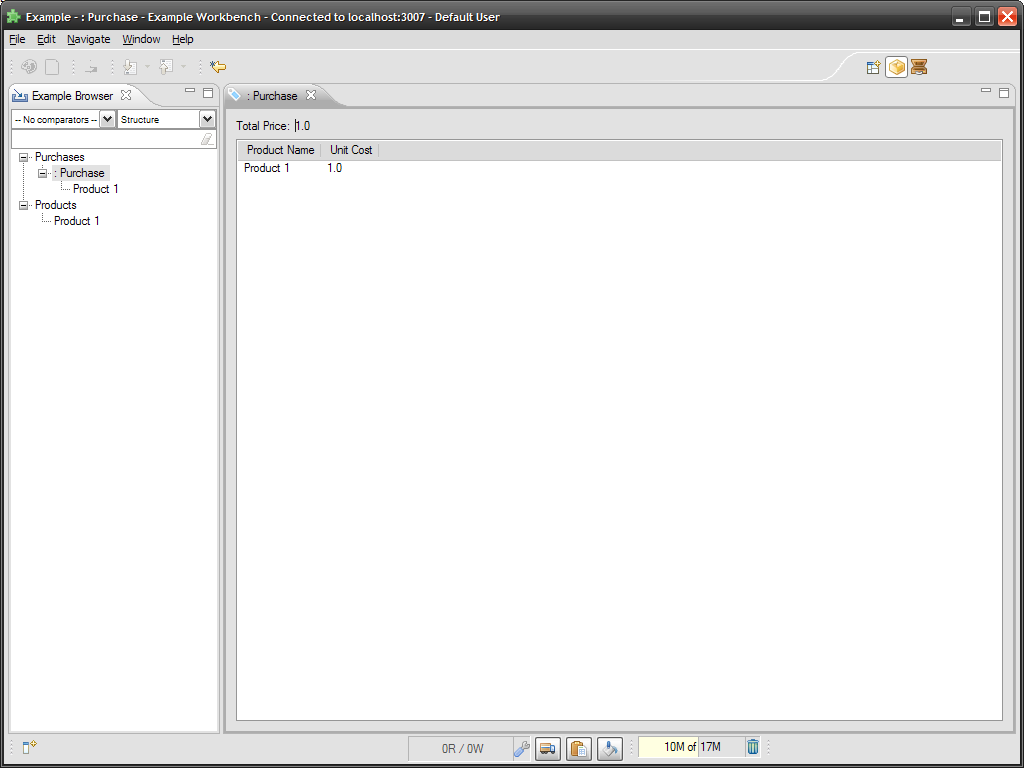
Ontology that we are using is defined in “example.graph” file. It is in tutorial_ontologies folder. To initialize the database you have to run generate_tutorials.bat. To run the example application, use simantics-example.product. After selecting tutorial project, you should get user interface like in Figure 1.
When you use the application you may notice following:
- Name of the customer or the date of the order is not shown anywhere.
- When purchase editor is open, new products won’t show up in it. Only closing and opening the editor shows the products.
- Adding new products to purchases can be done only in Example Browser
- While you can order several products, you cannot order multiple items of the same product.
Org.simantics.example plug-in is split into four packages:
- editors: Purchase Editor implementation.
- handlers: UI actions.
- project: Project binding. See … for more details.
- stubs: Taxonomy generated from the used ontology.
The most important parts of this tutorial are editors.AsyncPurchaseEditor and classes in handlers-package.
Adding the missing information to UI
First we have to add new Text widgets to the Purchase Editor. At the beginning of AsyncPurchaseEditor.java you see:
// UI controls
private final Text totalCost;
private final TableViewer productViewer;
private final TableViewerColumn nameColumn;
private final TableViewerColumn costColumn;
Add new line after totalCost:
private final Text customer;
private final Text date;
Then we have to instantiate text fields, create labels that inform user what the text fields mean, and setup the layout properly. In the beginning of the constructor modify:
Label l = new Label(this, SWT.NONE);
l.setText("Total Price:");
GridDataFactory.fillDefaults().applyTo(l);

totalCost = new Text(this, SWT.NONE);
totalCost.setEditable(false);
GridDataFactory.fillDefaults().grab(true, false).applyTo(totalCost);
To:
Label l = new Label(this, SWT.NONE);
l.setText("Customer:");
GridDataFactory.fillDefaults().applyTo(l);

customer = new Text(this, SWT.NONE);
customer.setEditable(false);
GridDataFactory.fillDefaults().grab(true, false).applyTo(customer);

l = new Label(this, SWT.NONE);
l.setText("Date:");
GridDataFactory.fillDefaults().applyTo(l);

date = new Text(this, SWT.NONE);
date.setEditable(false);
GridDataFactory.fillDefaults().grab(true, false).applyTo(date);

l = new Label(this, SWT.NONE);
l.setText("Total Price:");
GridDataFactory.fillDefaults().applyTo(l);

totalCost = new Text(this, SWT.NONE);
totalCost.setEditable(false);
GridDataFactory.fillDefaults().grab(true, false).applyTo(totalCost);
And finally, we have to update text fields to show the data. Modify updateUI(Model m) method to contain:
customer.setText(m.boughtBy);
date.setText(m.boughtAt);
Fixing the editor updates
Currently the Purchase Editor loads products in the purchase when the editor is opened, but if new products are added, editor’s user interface won’t update. To fix this, modify AsyncPurhaseEditor’s setInput(Resource) method. Currently the method is:
public void setInput(Resource r) {
    this.input = r;
    if (input == null)
        return;

    session.asyncRequest(new Read<Model>() {
       @Override
       public Model perform(ReadGraph graph) throws DatabaseException {
           return loadModel(graph, input);
       }
    }, new Procedure<Model>() {
          @Override
          public void exception(Throwable throwable) {
                ExceptionUtils.logAndShowError(throwable);
          }
          @Override
          public void execute(final Model result) {
            // Set the loaded model as the model viewed by the UI.
            getDisplay().asyncExec(new Runnable() {
               @Override
               public void run() {
                  if (isDisposed())
                     return;
                  updateUI(result);
               }
            });
         }
   });
}
Hint: You have to replace the Procedure with an AsyncListener.
Answer:
public void setInput(Resource r) {
   this.input = r;
   if (input == null)
      return;

   session.asyncRequest(new Read<Model>() {
      @Override
      public Model perform(ReadGraph graph) throws DatabaseException {
         return loadModel(graph, input);
      }
   }, new AsyncListener<Model>() {
        @Override
        public boolean isDisposed() {
        	return AsyncPurchaseEditor.this.isDisposed();
        }

        @Override
        public void exception(AsyncReadGraph graph, Throwable throwable) {
        	ExceptionUtils.logAndShowError(throwable);
        }

        @Override
        public void execute(AsyncReadGraph graph, final Model result) {
            // Set the loaded model as the model viewed by the UI.
            getDisplay().asyncExec(new Runnable() {
               @Override
               public void run() {
                  if (AsyncPurchaseEditor.this.isDisposed())
                     return;
                  updateUI(result);
               }
            });
        }
    });
}
After this modification the editor should update its contents when the data is changed. You may try to add new product to purchase order when the editor is open to check that it really works.
Adding Context Menu to Purchase Editor
We are going to add context menu to Purchase editor. The context menu will be used for adding new products to a purchase.
There are several ways to implement the context menu in Eclipse. For sake of simplicity, we are not going to implement context menu that allows contributions from plug-in definitions (plugin.xml).
The code that Example Browser uses in its menu is in handlers.AddProductsContributionItem. Sadly, we cannot reuse that implementation, since it uses Eclipse’s selection mechanism to interpret current purchase, while we want to use the purchase that editor has opened.
Put this class to AsyncPurchaseEditor.java:
public class AddProductsContributionItem extends CompoundContributionItem {

  public AddProductsContributionItem() {
    super();
  }

  public AddProductsContributionItem(String id) {
    super(id);
  }

  @Override
  protected IContributionItem[] getContributionItems() {

    ProductManagerImpl manager = SimanticsUI.getProject().getHint(ProductManager.PRODUCT_MANAGER);

    Map<Resource, String> products = manager.getProducts();

    final Resource purchase = input;

    IContributionItem[] result = new IContributionItem[products.size()];
    int i=0;
    System.out.println("Products count = " + products.size());
    for(Map.Entry<Resource, String> entry : products.entrySet()) {
      final Resource product = entry.getKey();
      result[i++] = new ActionContributionItem(new Action("Add " + entry.getValue()) {
        @Override
        public void run() {
          SimanticsUI.getSession().asyncRequest(new WriteRequest() {
            @Override
            public void perform(WriteGraph graph) throws DatabaseException {
              Builtins b = graph.getBuiltins();
              if(!graph.hasStatement(purchase, b.ConsistsOf, product))
                graph.claim(purchase, b.ConsistsOf, product);
              }
           });
         }
      });
    }
    return result;
  }
}
It is the same code as handlers.AddProductsContributionItem, but the selection mechanism has been replaced with the editor input.
To add context menu to the editor, add this code to the end of AsyncPurchaseEditor’s constructor:
final MenuManager manager = new MenuManager();
manager.add(new AddProductsContributionItem());
Menu menu = manager.createContextMenu(productViewer.getControl());

this.addDisposeListener(new DisposeListener() {

    @Override
    public void widgetDisposed(DisposeEvent e) {
	manager.dispose();
    }
});

productViewer.getControl().setMenu(menu);
Supporting multiple items of the same product
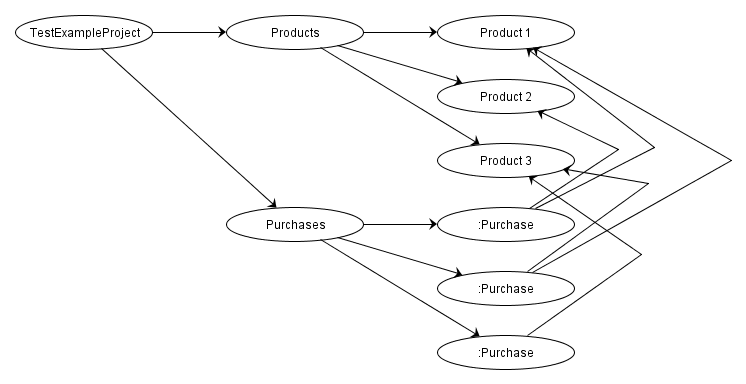
Current ontology is designed so that one purchase order contains products, but product count cannot be stored anywhere [Figure 2].
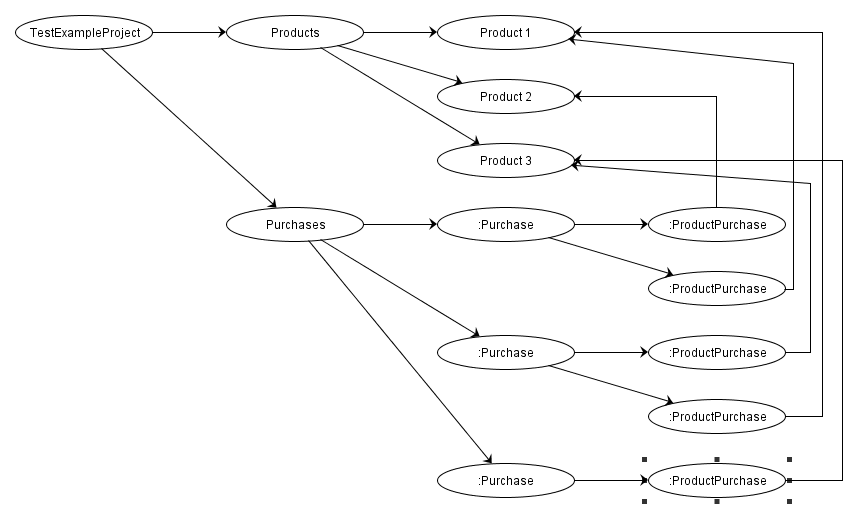
To add support for product count we have to change the ontology. We have to introduce new type “ProductPurchase” that will have link to ordered Product and property for product count [Figure 3].
Open the ontology (example.graph) and add these to ExampleOntology:
ProductCount <R L0.HasProperty : L0.FunctionalRelation
    L0.HasDomain [ProductPurchase]
    L0.HasRange [L0.Double]

ProductPurchase <T L0.Entity
   [ProductCount card "1"]
   [L0.ConsistsOf all Product]
Also replace Purchase definition with:
Purchase <T L0.Entity
    [BoughtBy card "1"]
    [BoughtAt card "1"]
    [L0.ConsistsOf all ProductPurchase]
After this generate the database (run generate_tutorials.bat) and refresh your workspace (Eclipse caches files, and does not automatically detect if files have been changed). You must also remember to clean the applications workspace, since now it has a database with old ontologies.
To get the application working, we must update AddProductContributionsItem.java and AsyncPurchaseEditor.java. We start with the AddProduct…java. Currently its wrote transaction is:
public void perform(WriteGraph graph) throws DatabaseException {
   Builtins b = graph.getBuiltins();
   if(!graph.hasStatement(purchase, b.ConsistsOf, product))
      graph.claim(purchase, b.ConsistsOf, product);
}
This just creates a link between the Purchase and selected Product. We need to create an instance of ProductPurchase link it to the Purchase and to selected Product:
public void perform(WriteGraph graph) throws DatabaseException {
   Builtins b = graph.getBuiltins();
   ExampleResource e = ExampleResource.getInstance(graph);

   for (Resource productPurchase : graph.getObjects(product, b.ConsistsOf)) {
      if (graph.hasStatement(productPurchase, b.ConsistsOf, product))
           return;
      }

    Resource productPurchase = graph.newResource();
    graph.claim(productPurchase, b.InstanceOf, e.ProductPurchase);
    graph.claimValue(productPurchase, e.ProductCount, 1.0);
    graph.claim(purchase, b.ConsistsOf, productPurchase);
    graph.claim(productPurchase, b.ConsistsOf, product);
}
This code checks first if the product is already in the purchase, and does not do anything if it is.
Then we edit AsyncPurchaseEditor.java. Start by adding “amount” to Item:
class Item {
   String name;
   double costs;
   double amount;
}
Next, change loadModel() method to read the data in current form and include product count:
if (g.isInstanceOf(modelResource, ex.Purchase)) {
   Resource purchase = modelResource;
   m.boughtAt = g.getRelatedValue(purchase, ex.BoughtAt);
   m.boughtBy = g.getRelatedValue(purchase, ex.BoughtBy);

   List<Item> items = new ArrayList<Item>();
   for (Resource productPurchase : g.getObjects(purchase, g.getBuiltins().ConsistsOf)) {
     	Resource product = g.getSingleObject(productPurchase, b.ConsistsOf);
      Item i = new Item();
      i.name = g.getRelatedValue(product, b.HasName);
      i.costs = g.getRelatedValue(product, ex.Costs);
      i.amount = g.getRelatedValue(productPurchase, ex.ProductCount);
      items.add(i);
   }
   m.items = items.toArray(new Item[items.size()]);
}
Then update AddProductContributionItem inside AsyncPurchaseEditor.java to match the previous edit.
To show the product count we have to add new column to the table. First, create a member for the column:
private final TableViewerColumn amountColumn;
Then initialize the column in the AsyncPurchaseEditor’s constructor:
amountColumn = new TableViewerColumn(productViewer, SWT.LEFT);
amountColumn.getColumn().setWidth(100);
amountColumn.getColumn().setText("Amount");
amountColumn.setLabelProvider(new CellLabelProvider() {
    @Override
    public void update(ViewerCell cell) {
        Item i = (Item) cell.getElement();
        cell.setText(String.valueOf(i.amount));
    }
});
And last, change updateUI() method to calculate total costs correctly and update the table’s layout:
private void updateUI(Model m) {
   // Update the UI based on the contents of the specified model.
   double total = 0;
   for (Item i : m.items) {
      total += i.costs * i.amount;
   }
   totalCost.setText(String.valueOf(total));

   customer.setText(m.boughtBy);
   date.setText(m.boughtAt);

   productViewer.setInput(m);

   nameColumn.getColumn().pack();
   costColumn.getColumn().pack();
   amountColumn.getColumn().pack();
}
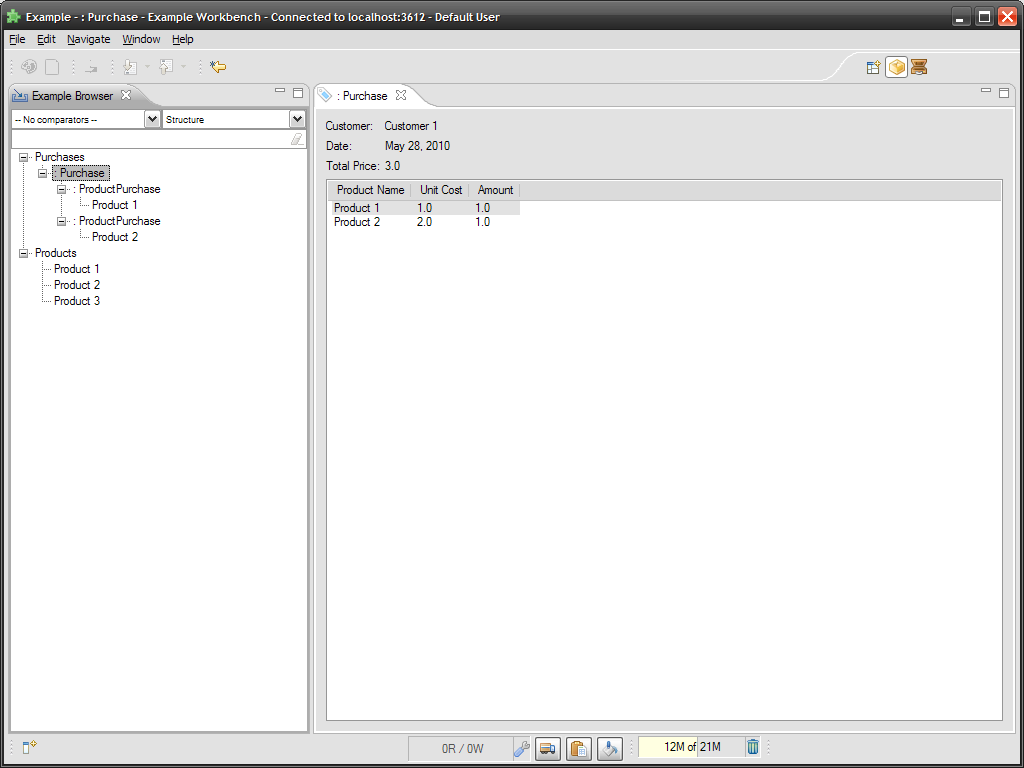
After these modifications, your application should look like in Figure 4.
Development note
While Simantics DB uses transactions, it does not conform to ACID (atomicity, consistency, isolation, durability) rules:
- Atomicity: If something fails during write trasaction, changes are that part of the written data has already gone into the database. Only way to continue is to restart Simantics. This should be fixed in 1.2 version.
- Consistency: Most of the core requires the content of the database to be semantically correct, but there is no mechanism to verify it. Semantics of written data are not checked, which may result semantically incorrect, and possibly unusable database. What breaks this rule even more, is that Simantics cannot handle large amount of data in single transaction, forcing developers to break large operations into multiple smaller transactions, that may be difficult to keep semantically correct.
- Isolation: In theory Simantics DB allows multiple reads on a single write transaction at the same time, so it should follow this rule. But in some cases a failure in query may cause a write transaction and whole database connection to fail. (TODO: haven’t seen this with the latest version)
- Durability: Failure to close the database correctly will cause lost and/or corrupted data. Data corruption has been reported even with properly running / closed database.


