Project Development
Overview
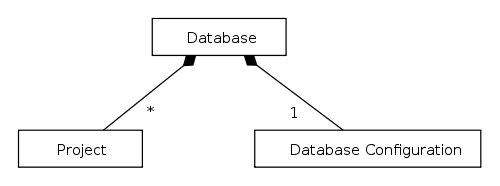
From the Simantics project framework's point of view the content of a Simantics database is broken into projects and database configuration. A database can contain any number of projects. The configuration data is global and shared by all projects. In essence, projects are database entities (resources), that consist of all the data produced and consumed when working a subject with Simantics.

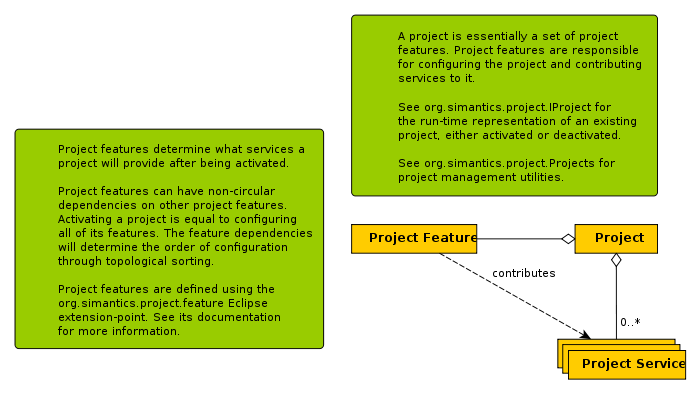
Ok, structurally projects are database entities, how about behavior? Applications have interactive user interfaces, that exert some kind of behavior to perform actions on the project structure in the database. When a Simantics application is started for the purpose of working on a project, the project must be loaded. Minimally, this only means finding the project resource. However, often it is also necessary to perform other kinds of initialization steps during project loading. This is where project features come into play. Project features are a mechanism for attaching configuration steps to project loading/unloading. See Figure 2 for a conceptual drawing.

Project Features
The Simantics project system is based on features. Conceptually, a project feature in this context is a mechanism attaching life-cycle handling actions to the events of opening and closing a project. Technically, a project feature in is simply a code contribution that configures/deconfigures an IProject object when it is activated/deactivated.
An IProject is an IHintContext. The hint context aspect of IProject is used for runtime storage of all project-related properties. IHintContext allows other parties to listen to changes in these run-time project properties. For example, your project can contain properties that define project-specific services.
Project features can depend on (require) other features. This information is used to construct the order in which features configure/deconfigure a project, which is resolved through topological sorting.
Project features can be marked as published. This property is intended to be used for top-level features that configure a certain complete piece of functionality for a project. Top-level features are also intended to be presented to users in the Simantics Project Manager application (SPM, in development). Features can also be marked with installGroup definitions that are intended to be used to inform SPM of the Eclipse features that need to be installed into a provisioned workbench application in order for it to work with the particular project feature.
Basic Database Structure
The most basic structure of each Simantics database is as follows:
Root Library : L0.Library (<http:/>)- A common entry point that always exists (see Builtins.URIs.RootLibrary). All resources and data that can be deemed reachable within a database must be browsable starting from this resource.
Consists OfProjects : L0.Library (<http://Projects>)- Consists of all projects contained by the database
InstalledGraphBundles : L0.Entity (<http://InstalledGraphBundles>)- Consists of the ontology bundles (.tg files) imported into this database. This is part of database configuration. See DatabaseManagement.pgraph for the related ontology.
What is said here does not dictate what can be in a Simantics database. The database can contain arbitrary structures based on the Layer0-ontology. This text only focuses on the parts of the database that are relevant to the project framework.
Project Loading
This section explains the process of loading a project, step-by-step.
As described in the previous section, every project in the database is attached to the the http://Projects library. Shortly, the project loading consists of:
- Resolving an ordered set of project features that need to be configured for the project runtime.
- Configuring the resolved project features for an org.simantics.project.IProject instance.
The actual configuration part is trivial, it is done by IProject.activate(). The interesting part is the first one, feature resolution. Let's look at it through an example. Here is a synthetic example of a top-level project feature.
<syntaxhighlight lang="xml"> <extension point="org.simantics.project.feature"> <feature class="org.example.project.ProjectFeature" description="Example top-level project feature." id="org.example.project" label="Example Project" published="true"> <requires id="org.simantics.simulation.experimentManager"/> <installGroup id="org.example.feature.group" version="[1.0.0,2.0.0)"/> </feature> </extension> </syntaxhighlight>
There are two important lines to notice here. One is the <installGroup> definition and the other is the published="true" attribute. We'll come to the why shortly.
A project must contain definitions of what Eclipse Features are used with it. Eclipse Features are Feature Projects created for the Eclipse environment. Do not mistake them for project features that have been discussed so far.
The project framework expects to find
- Projektiresurssista etsitään kaikki PROJ.HasFeature relaatiot ja niiden takana olevat : PROJ.FeatureSpec:t. FeatureSpeceissä on olennaisena data: HasGroupId "org.example.feature.group"
- Projektin lataus päättelee, että sen pitää ottaa projektia ladatessa käyttöön kaikki ProjectFeaturet, joihin on merkitty <installGroup:lla> jokin sellainen feature/versio joka löytyy myös Projektiin liitetyistä HasFeature-määrityksistä. Samalla latauslogiikka etsii transitiivisen sulkeuman <requires> määrityksiä pitkin löytääkseen koko sen joukon project featureita, mitä pitää ladata. Lisäksi <requires> verkkoa käytetään ProjectFeatureiden alustusjärjestyksen muodostukseen topologisen järjestämisen kautta.
- Projektin ladataan konfiguroimalla resolvattu ProjectFeature-joukko topologisessa järjestyksessä.
Nyt sitten se, miten SPM tähän kaikkeen liittyy ja miten se on nyt korvattu toistaiseksi.
SPM:llä työtilaa asennettaessa/rakennettaessa valitaan siinä käytössä olevat "featuret". Tässä yhteydessä featureilla tarkoitetaan nimenomaan eclipsen featureita, kuten "fi.vtt.apros.feature", jonka nimeksi OSGI/P2 systeemeissä tulee "fi.vtt.apros.feature.group". Samalla voidaan myös valita käytettävä versio, jolloin tunnisteeksi voi tulla esim. fi.vtt.apros.feature.group/1.2.0.xyz
Tämä tarkoittaa, että SPM on siis vastuussa noiden Projektiin liittyvien PROJ.HasFeature _ : PROJ.FeatureSpec:ien asentamisesta.
Noh, nyt kun meillä ei ole SPM:ää, niin SimanticsPlatformissa on tällainen fallback-logiikka:
       // 6. Install all features into project, if in debug mode
       if (installProject)
       {
           // Attach all feature groups available in platform to created project
           progressMonitor.setTaskName("Install all features");
           Set<GroupReference> publishedFeatureGroups = ProjectFeatures.getInstallGroupsOfPublishedFeatures();
           Collection<GroupReference> groupsWithoutVersion = GroupReference.stripVersions(publishedFeatureGroups);
           ...
                   Projects.setProjectInstalledGroups(writeGraph(), projectResource, groupsWithoutVersion);
           ...
eli toi SimanticsPlatform huolehtii SPM:n töistä toistaiseksi.
Project Features Step-by-step
Step 1: define extensions for your project features
First add a plug-in dependency on org.simantics.project.
Extensions are defined using the org.simantics.project.feature extension point. See the extensions point's own reference document for detailed information (currently only viewable by opening the EP in eclipse).
The following example demonstrates the use of all current features of the extension point, namely project features, dependencies between project features (requires) and bindings between project features and Eclipse platform features (installGroup). This example assumes that you have a plug-in myplugin and a feature project myplugin.feature (feature id=myplugin) for it.
<syntaxhighlight lang="xml"> <extension point="org.simantics.project.feature"> <feature description="My project type's main project feature." class="myplugin.MyProjectFeature" id="myplugin.project" label="My project" published="true"> <requires id="myplugin.dummy"/> <installGroup id="myplugin.feature.group"/> </feature> <feature class="myplugin.MyDummyFeature" id="myplugin.dummy" label="My dummy feature"> </feature> </extension> </syntaxhighlight>
The above contains two project features, the first one is published and requires the second one. This means that when loading a project that uses the myplugin.project feature, myplugin.dummy feature will be configured before myplugin.project.
Step 2: define the code for the project features
Copy the following classes into corresponding source files:
<syntaxhighlight lang="java"> package myplugin; class MyProjectFeature extends AbstractProjectFeature {
private static final String DEFAULT_PERSPECTIVE = "myplugin.myperspective";
@Override public void configure() throws ProjectException { getProject().setHint(ProjectKeys.DEFAULT_PERSPECTIVE, DEFAULT_PERSPECTIVE); }
@Override public void deconfigure() throws ProjectException { // Dispose of anything that needs to be disposed of within the project's // hint context which can be accessed through getProjectElement(). } } </syntaxhighlight>
<syntaxhighlight lang="java"> package myplugin; class MyDummyFeature extends AbstractProjectFeature {@Override public void configure() throws ProjectException { // Setup some hints if you need to
try { // Do something with the database setupDatabase(); } catch (DatabaseException e) { throw new ProjectException(e); } }
private void setupDatabase() throws DatabaseException { getSession().syncRequest(new WriteRequest() { @Override public void perform(WriteGraph graph) throws DatabaseException { //... } }); }
@Override public void deconfigure() throws ProjectException { // Dispose of anything that needs to be disposed of within the project's // hint context which can be accessed through getProjectElement(). } } </syntaxhighlight>
Optional Step: Using ready-made project features
This step is not necessary but is here both for information and educational value. This example shows how to add a feature to your project that advertises ontology dependencies for your project which is necessary for example if (full-text) indexing of ontology dependencies is desired.
A new project feature, here myplugin.dependencies, must also be added to the previous example:
<syntaxhighlight lang="xml"> <extension point="org.simantics.project.feature"> <feature description="My project type's main project feature." class="myplugin.MyProjectFeature" id="myplugin.project" label="My project" published="true"> <requires id="myplugin.dummy"/> <requires id="myplugin.dependencies"/> <installGroup id="myplugin.feature.group"/> </feature> <feature class="myplugin.MyDummyFeature" id="myplugin.dummy" label="My dummy feature"> </feature> <feature class="org.simantics.project.features.DependencyValidationFeature:http://www.example.org/MyOntology-1.0/ImportedOntologies" id="myplugin.dependencies" label="My plugin dependencies"> </feature> </extension> </syntaxhighlight>
The myplugin.dependencies feature definition gives http://www.example.org/MyOntology-1.0/ImportedOntologies as an argument to DependencyValidationFeature which will mark the dependency on the specified namespace requirement in the project.
We still need to define the ontology containing the NamespaceRequirement we referred to in the feature. Following the instructions at org.simantics.graph create a project to contain Simantics ontologies and add a new .pgraph file into it. You can fill the .pgraph with something like the following:
<syntaxhighlight lang="python"> L0 = <http://www.simantics.org/Layer0-1.0> PROJ = <http://www.simantics.org/Project-1.0>
MY_ONTOLOGY = <http://www.example.org/MyOntology-1.0> : L0.Ontology @L0.new
//# The project feature refers to this instance MY_ONTOLOGY.ImportedOntologies : PROJ.NamespaceRequirement L0.HasDescription "Specifies the ontologies required by a this project. Used e.g. for indexing the database." PROJ.RequiresNamespace "http://www.simantics.org/Layer0-1.0" : L0.URI "http://www.simantics.org/G2D-1.0" : L0.URI "http://www.simantics.org/Diagram-2.0" : L0.URI </syntaxhighlight>
Development
Framework Entry Points
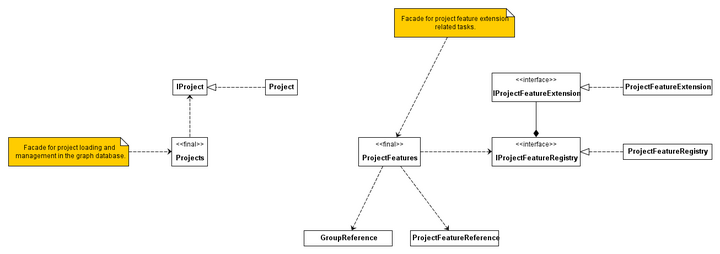
As shown in figure 2 there are two main entry-points in the project framework:
- class Projects
- A facade class containing utilities for loading and managing projects in a Simantics database.
- class ProjectFeatures
- A facade class containing utilities for retrieving and filtering project feature extensions with different criteria. The implementation is backed by the project feature extension registry.

Scenarios
Omnipresent Project Features
Consider the following scenario: A developer wishes to provide a plug-in that can be inserted into any Simantics workbench application in order to give the plug-in the chance to attach itself to the project worked on with that particular workbench instance.
Project features are a natural instrument for this purpose. The only problem in getting your project feature to load. It may be that your workspace's project does not employ any installGroup used by your project feature. Also your new project feature is probably not required by any of the project features that are active in your project.
For this purpose, we define a single installGroup ID that the project framework considers to always be included in the set of installGroups for any project. So:
Use installGroup ID omnipresent for features that are meant to be used with any project. Also remember to set published=true.
To define an omnipresent project feature, use the following template:
<syntaxhighlight lang="xml"> <extension point="org.simantics.project.feature"> <feature description="My omnipresent project feature." class="myplugin.MyOmnipresentProjectFeature" id="myplugin.omnipresent.feature" label="Omnipresent feature" published="true"> <installGroup id="omnipresent"/> </feature> </extension> </syntaxhighlight>
Load project from database and activate it
<syntaxhighlight lang="java">
   public IProject loadAndActivateProject(Session session, Resource project) throws DatabaseException, ProjectException {
       IProject project = Projects.loadProject(session, project);
       project.activate();
       return project;
   }
</syntaxhighlight>
Retrieving the active project in a Simantics workbench application
The Simantics Workbench UI is built so that always when the user is working on a project, the UI will have both an active database session and an active project. The active project can be used to store any project-related services and data using the IHintContext interface it implements.
SimanticsUI (SVN) is the class for retrieving both the active database session and the active project using these:
<syntaxhighlight lang="java"> public class SimanticsUI {
...
   /**
    * Returns the database session context associated with the currently active
    * workbench window. This method should be used to retrieve session contexts
    * only when the client is sure that the correct workbench window has focus.
    *
*
* If the client knows the workbench window it is working with, but it isn't * sure that the correct workbench window has focus, use * {@link #getSessionContext(Object)} instead. *
    *
    * @return the session context associated with the currently active
    *         workbench window or null if the active window has no
    *         session context
    */
   public static ISessionContext getSessionContext() { ... }
   /**
    * @return the currently open and active project as an IProject or
    *         null if there is no active session or project
    */
   public static IProject peekProject() { ... }
   /**
    * @return the currently open and active project as an IProject
    * @throws IllegalStateException if there is no currently active database
    *         session, which also means there is no active project at the
    *         moment
    */
   public static IProject getProject() { ... }
...
} </syntaxhighlight>